After you’ve created a sensitive information type, you can test its effectiveness against sample data and update it to improve its detection capability.
Note
You can test both built-in and custom sensitive information types, but you cannot edit the built-in types.
To test one of the sensitive information types you’ve created, you can follow these steps:
- Create sample data that should be identified by one of the sample SITs that you’ve created. In one of the examples, we used keywords such as employee id, emplid, and employeeid to create a keyword list-based SIT.
- Navigate to the Microsoft Purview compliance portal (https://compliance.microsoft. com), expand Data classification, select Classifiers, and then select Sensitive info types.
- Select the custom SIT that you want to test.
- On the classifier’s information page, select Test, as shown in Figure 10.11:
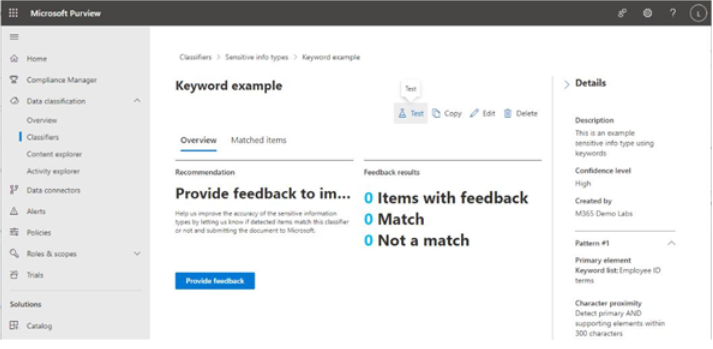
Figure 10.11 – Classifier information page
- On the Upload file flyout, click Upload file and browse to your sample data.
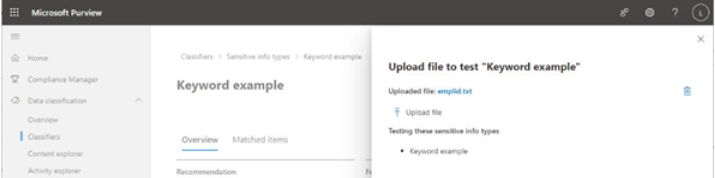
Figure 10.12 – Uploading a sample file
- Click Test.
- Review the output of the Match results page.
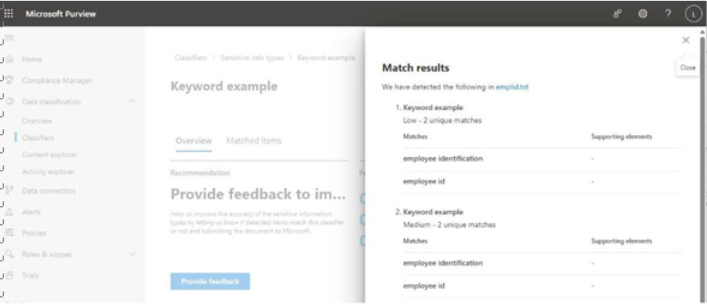
Figure 10.13 – Reviewing the match detections
- Click Finish.
The match results can help you fine-tune the rules around the sensitive information type, including keywords and dictionaries, proximity, and any supporting elements. If you had anticipated the uploaded content to match and it didn’t (or didn’t with the level of confidence you expected), you can modify the sensitive information type by clicking the Edit button on the SIT’s information page.
Next, you’ll shift to managing labels and policies, and then see how you can use sensitive information types to help manage content.
Implementing retention labels, retention label policies, and retention policies
Retention labels and policies can be used to both retain and remove content based on organizational requirements.
Before we go too far, it’s important to understand how M365 handles retention. The diagram in
Figure 10.14 provides a high-level view of Microsoft’s principles of retention:
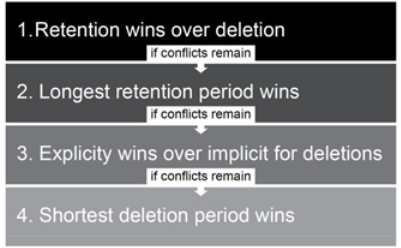
Figure 10.14 – The principles of retention
Here are some examples of the principles of retention in practice:
• If a document has both a retention action and a deletion action applied to it, the retention action always takes precedence. For example, if a document has a retention policy configured to be retained for 3 years but also has a retention policy or label applied to it that says to delete after 1 year, the retain action will be in effect for 3 years. After the retention period has expired, the delete action will take effect.
• If a document has two retention policies or labels that apply to it, whichever one specifies the longest retention period will be the one that governs the minimum amount of time that the document will be preserved.
• If a document inherits a retention policy (for example, from a SharePoint site) with a delete action but also has a manually applied retention label with a delete action, the action associated with the label will take precedence, even if it specifies a longer deletion period than the inherited policy. For example, say a document inherits a retention policy with a delete action after 5 years. If a label is applied to the document that specifies it is to be deleted after 7 years, the document will be deleted after 7 years (not 5 years per the inherited label).
• If a document has multiple deletion policies or labels applied to it, the one with the shortest deletion period wins. Consider a policy that has been configured with only a delete action to take place after 3 years in conjunction with a policy that specifies delete after 5 years. When both policies are applied to a document, the evaluation of the shortest policies ensures that the document will be deleted after 3 years. If another policy is added that forces the item’s deletion after 1 year, the 1-year policy will take effect.
In this section, we’ll look at how retention labels and policies can be used across the organization.