Retention policies are rule-driven configurations that allow you to manage the lifecycle of data in the organization. Retention policies are created with three core purposes in mind:
• To protect and retain data for a minimum amount of time
• To ensure data doesn’t continue to persist after a specific period of time
• To govern the entire data lifecycle—both retaining for a minimum amount of time and ensuring it is disposed of at the end of its lifetime
Depending on the workload, content can be evaluated for retention based on when the content was created or modified. Retention policies are applied at a workload level (think SharePoint Online, Exchange Online, or Teams), with exceptions that can be made for sites, mailboxes, groups, or other container-type items.
To create a retention policy, follow these steps:
- Navigate to the Microsoft Purview compliance portal (https://compliance.microsoft. com), expand Data lifecycle management, and select Microsoft 365.
- Select the Retention policies tab and then click New retention policy, as shown in Figure 10.15:
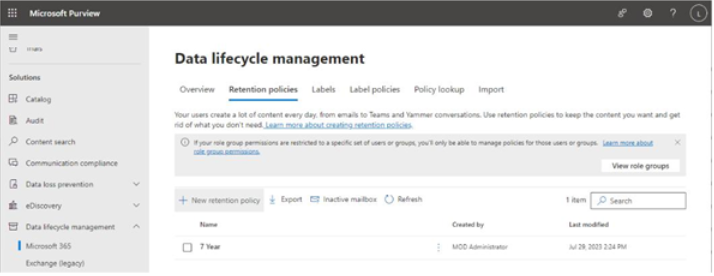
Figure 10.15 – Retention policies tab
- On the Name your retention policy page, enter values for Name and Description and click Next.
- If you have either M365 E5, Enterprise Mobility + Security E5 (EMS E5), or the Advanced Compliance license, you can choose from the options on the Policy Scope page. By default, retention policies apply organization-wide, but with the E5 or Advanced Compliance features, you can choose to restrict the policy to individual admin units. To scope a retention policy to an administrative unit, click Add or remove units on the Policy Scope page and then select the administrative units from the flyout.
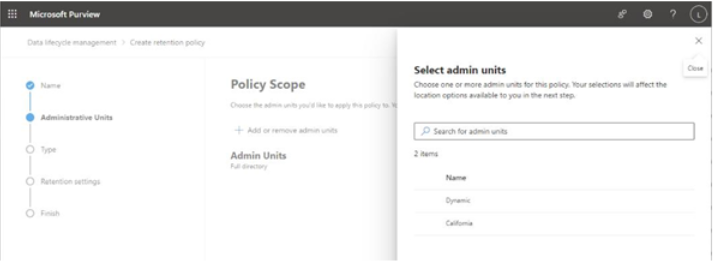
Figure 10.16 – Selecting administrative units
- Click Next.
- On the Type page, select either an Adaptive policy (if your tenant has M365 E5, EMS E5, or the Advanced Compliance license) or a Static policy. Adaptive scopes are dynamic selection queries that search for attributes of content sources (such as mailboxes for users that have Marketing as their department value), while static policies are applied to workloads directly. Click Next.
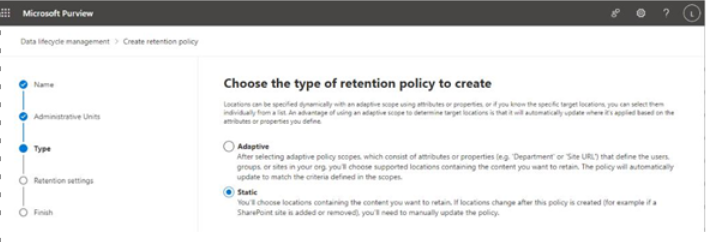
Figure 10.17 – Selecting the policy type
Note
Adaptive scopes can be created while working inside the retention policy wizard or through the Adaptive Scopes user interface under the Roles & scopes menu. Adaptive scopes can query organization-wide or be limited to administrative units. Adaptive scopes are targeted to users (based on Azure AD attributes), SharePoint sites (such as the site name, URL, and refinable strings), and Microsoft 365 groups(based on Azure AD attributes).
- On the Locations page, select the workloads where the policy is to be applied, as shown in Figure 10.18:
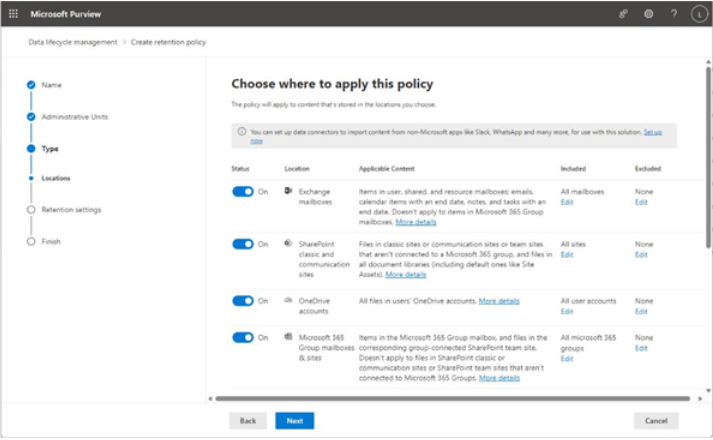
Figure 10.18 – Selecting workloads for policies
There are some caveats on how policies can be crafted:
• A policy that contains Teams channel messages or Teams chats cannot contain any other workloads. Teams channel messages and Teams chats can be part of the same policy.
• Teams private channel messages cannot be included in a policy with any other workloads.
• A policy that contains Yammer community messages or Yammer user messages cannot contain any other workloads. Yammer community messages and Yammer messages can be part of the same policy.
- Further refine the content that the policy applies to by adding entries under either the Included or Excluded column for the corresponding workload.
There are some caveats that also apply to inclusions and exclusions for static scopes:
A workload cannot have both inclusions and exclusions in the same policy. For example, you cannot select the Exchange mailboxes location, add a mailbox to the Included selection, and add a mailbox to the Excluded section. You would need to create a second retention policy.


There are limits to the maximum number of items that can be specified (either included or excluded) per workload, per policy:

SharePoint and OneDrive for Business sites: 100

All other workloads (Exchange mailboxes, M365 groups, Teams channel messages, Teams chats, Viva Engage/Yammer community messages, and Viva Engage/Yammer user messages): 1,000- Click Next.
- On the Retention settings page, specify the retention or deletion settings, as shown in Figure 10.19:
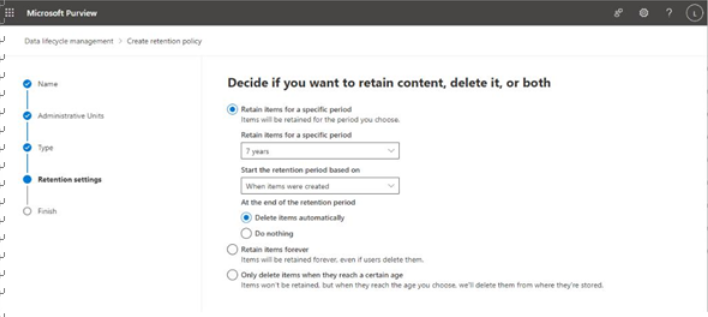
Figure 10.19 – Specifying the retention settings
You can choose to retain for a specified period (options are 5 years, 7 years, 10 years , and Custom, with the default being 7 years) and decide to evaluate items based on when they were created or when they were modified. You can also choose how to handle items at the end of the defined retention period—either leave them alone or delete them as part of a lifecycle governance process. You can choose to retain items forever (which removes the option to select how to deal with content at the end of the retention period as there is no end) or craft a policy whose sole purpose is to delete content based on age.
- Click Next.
- On the Finish page, review the settings. Adjust if necessary and click Submit.
Next, you’ll look at how retention labels can be layered on top of retention policies.