The challenge with the manual application of labels is that it requires interaction from the end user. If you have an M365 E5, EMS E5, or Advanced Compliance subscription, you can also use auto-application to help ensure your content is labeled.
You can start the auto-application process under the Data lifecycle management | Label policies tab in the Microsoft Purview compliance portal.
To create an auto-labeling policy, follow these steps:
- Navigate to the Microsoft Purview compliance portal (https://compliance.microsoft. com). Expand Data lifecycle management, and then select Microsoft 365.
- On the Data lifecycle management page, select the Label policies tab.
- Click Auto-apply a label, as shown in Figure 10.27:
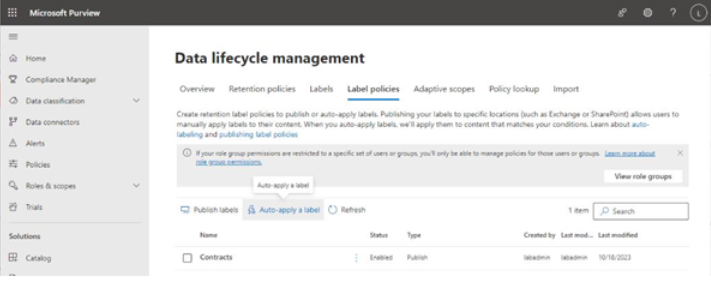
Figure 10.27 – Label policies tab
- On the Name page of the Create auto-labeling policy wizard, enter Name and Description values for the policy. Click Next.
- On the Info to label page, select the target of the content. You can choose from the following options:
• Apply label to content that contains sensitive info: This option will use either built-in or custom sensitive info types to identify matching content.
• Apply label to content that contains specific words or phrases, or properties: With this option, you can create a KQL (meaning Keyword Query Language, not to be confused with the other KQL acronym referring to the Kusto Query Language used with Sentinel and threat hunting) query to identify matching content.
• Apply label to content that matches a trainable classifier: This option allows you to select from pre-built or custom trainable classifiers. Trainable classifiers are machine learning-enabled classifiers that have been trained to identify relevant content based on things such as industry-standard terminology, legal agreements, financial forms, and human resources interactions.
• Apply label to cloud attachments and links shared in Exchange, Teams, and Viva Engage: This labeling option applies specifically to content that is shared via those mechanisms.
- Depending on which classification or detection method you use for content, you may have different options presented. When you have finished the selection criteria, click Next.
- On the Administrative Units page, specify the scope of the application. By default, the labeling policy is applied organization wide, but can be targeted based on administrative units. Click Next.
- On the Type page, select either an Adaptive policy (if your tenant has a M365 E5, EMS E5, or Advanced Compliance license) or a Static policy. Adaptive scopes are dynamic selection queries that search for the attributes of content sources (such as mailboxes for users that have Marketing as their department value), while static policies are applied to workloads directly. Click Next.
- On the Label page, select which label to auto-apply. Click Add label to choose from the labels configured in your tenant and then click Add.
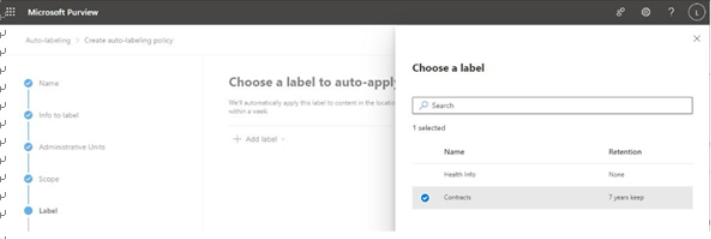
Figure 10.28 – Selecting a label
- Click Next.
- Depending on the settings configured, you can choose Test the policy before running or Turn on the policy. Click Next.
- On the Finish page, review the settings configured and make any adjustments if necessary. Click Submit.
In addition to the label interfaces in the Data lifecycle management area, there is another label interface that is available as part of record management.
There are advanced record management features, such as associating labels with file plans (overall document classification strategy), managing the disposition schedules for content (for customers with M365 E5, EMS E5, or Advanced Compliance licenses), and marking labeled items as records (see Figure 10.29).

Figure 10.29 – Creating a retention label that marks items as a record
Further reading
Marking an item as a record makes it immutable (unable to be edited, changed, or deleted). There are a number of restrictions and configuration options for records and regulatory records. You can learn more about record management in detail at https://learn.microsoft. com/en-us/purview/records-management.
There are some caveats related to label application that are important to note:
• Content can only have one retention label applied at a time.
• Labels that mark items as regulatory are configured through the Records management area.
In previous iterations of the compliance product, it was possible to enable a feature called Preservation Lock from the user interface. Preservation Lock is a feature that limits the future updates that can be made to a policy—such as shortening the length of retention. Once content was preserved with a policy that had Preservation Lock enabled, it was impossible to move the content to a less restrictive policy. Modifying this required significant effort through the engagement of a Microsoft support engineer. This feature has been moved to command-line availability only.
The current version of Preservation Lock has the following features for policies:
• The policy cannot be disabled or deleted.
• Locations can be added to the policy (but not removed).
• The retention period can be increased (but not decreased).
• The current version of Preservation Lock has the following features for label policies:
• The label policy cannot be disabled or deleted
• Locations can be added to the policy (but not removed)
• Labels can be added to the policy (but not removed)
To configure Preservation Lock for a policy or retention label, you need to connect to the security & compliance PowerShell endpoint and execute the following command:
Set-RetentionCompliancePolicy – Identity -RestrictiveRetenion $True
The final topic area you’ll cover in this chapter is sensitivity labels.